Interlocking pavers is probably one of the most cost effective and aesthetically pleasing products on the marketplace to add value to your property. The myriad of colors, shapes, sizes from a multitude of manufacturers will allow you to create the spectacular patio, walkway, terrace, or driveway that you dreamed of while adding value to your home.
As with any DIY project, installing interlocking pavers requires a bit of patience, time and elbow grease to come up with the finished look that you want. Here are some guidelines on how to prepare for the installation of interlocking pavers.
1. Research Interlocking Pavers and Materials
This is probably one of the most important parts of installing interlocking pavers. Good solid research will make your project a relatively smooth one. Here are some key questions you need to ask yourself:
- What do you want to do or accomplish or build and where do you want to build it? (e.g. pathway, terrace, patio, driveway, etc.)
- Ask for product catalogs and pricing sheets
- Visit the interlocking paver manufacturer’s website or visit our showroom or check out their picture gallery for ideas on things can be done.
- Ask questions to help understand the myriad of options and choices available such as mixing and matching stones from different manufacturers to create that unique look.
2. Draw and Sketch Your Landscape Vision
You don’t have to be a graphic artist to help you visualize your dream landscape. Roughly drawing your landscape layout will help you gather your thoughts and guide you through to the end of your project. By having your vision articulated on paper, you can always easily fine-tune your project with an eraser and pencil. You can start now by downloading this graph paper and sketch away.
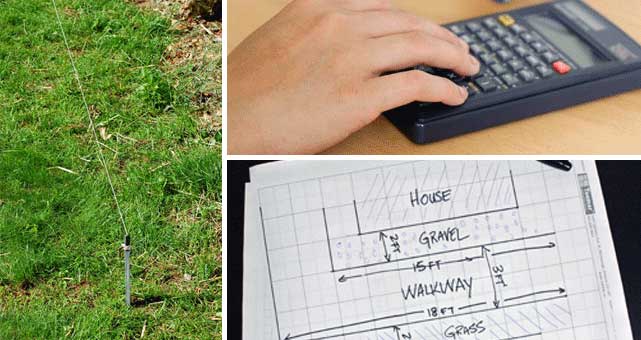
3. Taking Measurements
Measure the perimeter (sides) of the project. There are two approaches to measuring out the project.
- First method – use your garden hose to mark the area where the interlocking stone will be laid down. It is not the most accurate, but it does give you a good idea of how much square footage is being used.
- Second method – use wooden stakes and string and precisely mark out the area and then measure with a measuring tape.
With the second method, you eliminate the need to stake out the area again when you start digging, thus saving you some time and effort later on.
4. Smart Budgeting
Understanding how much want to spend and sticking with it will give you great satisfaction when you finish. There are typically 3 types of expenses you need budget or account for:
- Variable Expenses – These expenses are typically related specifically with the quantity, type, size, and color of the interlocking paver.
- Fixed Expenses – The expenses are the sand and gravel that you require to build a solid foundation. Regardless of what type of interlocking stone you decide to go with, you will typically have the same amount of sand and gravel.
- Miscellaneous Expenses – These expenses are extraneous items that will help you complete the project such as renting equipment, bins for waste disposal, and accessories.
5. Free Landscaping Advice
It doesn’t hurt that once you’ve got your plans put together to get some free expert advice. Call us and we will help you fine tune your landscape project and provide a quotation on all the required materials.
6. Timing it Right
Once you have finalize your plans, make sure you block out enough time in your schedule (eg. 1 day for 4 weekends, 2 days for 2 weekends) to complete the job in a timely manner. Don’t schedule a project a few weeks before an event because time pressure may cause you to make costly mistakes. Always give yourself extra time to compensate for any unforeseen delays such as rainy days. Lastly, the key to timing is to estimate the pace that you want to work at.
7. Pre-ordering for Less Headaches
Placing your pre-order for materials is also important to making sure that you are off to a smooth start. Landscape materials such as interlocking stone typically require a 24 hour notice for delivery while bulk materials have a turnaround of 4-6 hours. Other items such as bin rentals or tool rentals require 4-6 hours’ notice to ensure that the items are available.
8. Hiring your Friends/Family
Getting your friends and/or family to help you with a part of the job or the entire job will allow you to complete the job faster and make it far more enjoyable.
9. Hiring Local Labour
If none of your friends and/or family can help you out, you can always find local help through your local classified ads (Kijiji or Craigslist). For example, you may need someone to help you dig out the dirt and remove it or move the sand and gravel for you from the driveway to the project area. Make sure that you do your due diligence on the individual(s) and provide right tools to get the job done correctly.
10. Giving Yourself a Break
If you are doing this yourself, remember to give yourself a break every few hours or so that you can last through the day and for the entire project. Have plenty of fluids like water and snacks close by so you grab them when you need them.
To start reading about Part 2 of installing interlocking pavers, go here

Glad I was able to read this post.
I just love everything about this article.
This was really a good article. There are things that I can use for a future project.